Video Production – Understanding Formats and Sizes

video formats and sizes

Video production has been on the rise in the last decade, mainly due to the overwhelming need for video content across many social media platforms.  Today, there are many video formats and they all do vary in their codec quality, file size, and aspect ratios.  The best quality codec is not always the best format for all social media platforms.  In this article, I am going to look at different formats and sizes and how they are currently used in social media distribution. 

Understanding Video Aspect Ratios for Social Media

In the world of social media, video content is king, but using the right aspect ratio can make or break engagement. Aspect ratio refers to the proportional relationship between a video’s width and height. Different platforms favor specific ratios to optimize viewing experiences. Here’s a breakdown of the most common ones and where to use them. 

1. 16:9 (Widescreen)

– Best for: YouTube, Facebook, Twitter, LinkedIn  

-Use case:  Sta

2. 9:16 (Vertical)

– Best for: TikTok, Instagram Reels, YouTube Shorts, Facebook Stories  

– Use case: Designed for mobile-first consumption, making it ideal for full-screen, immersive experiences. 

3. 1:1 (Square)

– Best for: Instagram Feed, Facebook Feed, LinkedIn  

– Use case: Great for balanced framing, drawing attention on mobile and desktop feeds.

4. 4:5 (Portrait)

– Best for: Instagram and Facebook Feed  

– Use case: Takes up more screen space than a square video, improving visibility and engagement.

5. 2:3 (Tall)

– Best for: Pinterest, Instagram  

– Use case: Works well for posts where vertical framing enhances the subject.

Most phones film in vertical 9×16 aspect ratio

Choosing the Right Aspect Ratio

When creating content, consider where your audience will be watching. Widescreen is best for in-depth videos, while vertical and square formats work well for quick, engaging mobile content. Using the correct aspect ratio ensures your video looks professional and performs well across platforms. 

Understanding Different Video Formats for Social Media Posts

In today’s digital age, video content is an essential tool for engaging audiences on social media. However, choosing the right video format is crucial to ensure compatibility, quality, and optimal performance on different platforms. Let’s explore the most common video formats and their ideal uses for social media posts.

1. MP4 (MPEG-4 Part 14)

MP4 is the most widely used video format, offering high-quality compression and compatibility across almost all social media platforms. The compression standard that is most popular for internet posting is H.264, as it maintains a good balance between quality and file size, making it ideal for platforms like Facebook, Instagram, TikTok, Twitter, and LinkedIn.

Best for:

-General social media posts

-Advertisements

-Stories and reels

2. MOV (Apple QuickTime Movie)

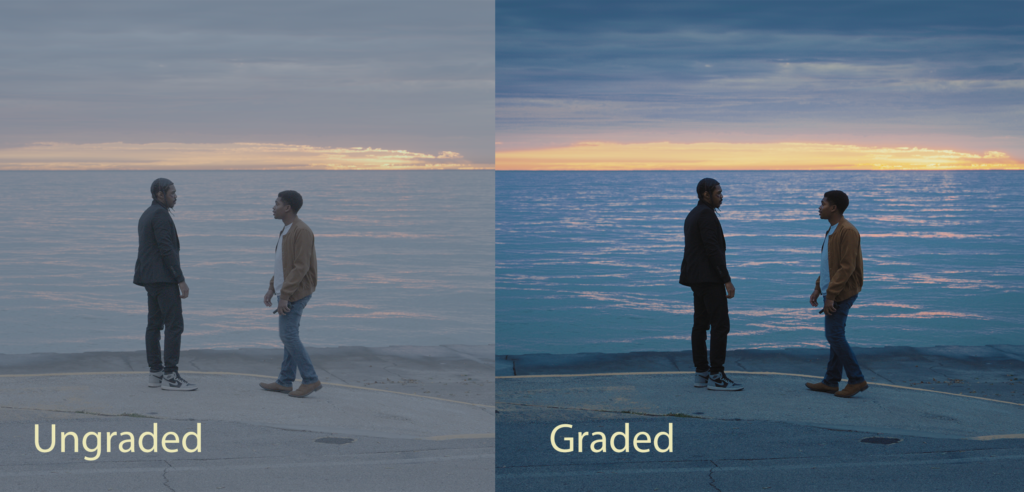
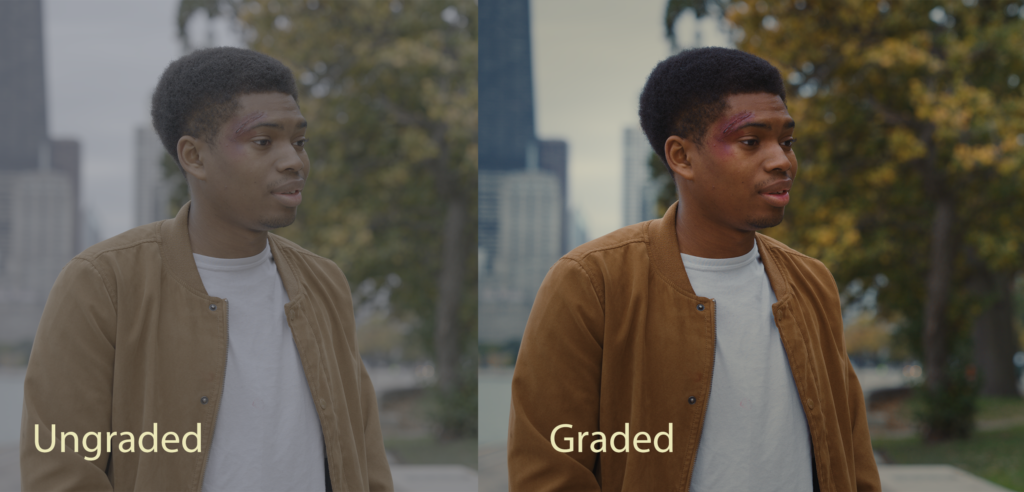
MOV files are known for high quality and are commonly used for professional video editing.  This format preserves the color quality achieved during video editing and color grading.   Although they are supported by platforms like Facebook and Instagram, their larger file size can be a drawback for online use unless compressed properly.  Therefore, once uploaded to social media or Youtube, this higher quality format will be compressed internally to h.264 within the platform.  

Best for:

-High-resolution video for LIVE projectors (film festivals)

-Professional content for TV or streaming platforms

-Editing before converting to MP4 for sharing

3. AVI (Audio Video Interleave)

AVI files, developed by Microsoft, provide high-quality video with minimal compression. However, their large file sizes make them less ideal for social media uploads. Some platforms may require conversion before posting.

Best for:

-Archival or raw footage before compression

-High-quality storage and editing

4. WMV (Windows Media Video)

WMV files are optimized for Windows devices and offer good quality with smaller file sizes. However, they are not as universally supported on social media platforms compared to MP4.  This format is essentially being phased-out.

Best for:

-Windows-based video sharing

-Email-friendly video clips

5. FLV (Flash Video)

FLV was once a dominant format for online video streaming, but it has declined in use due to the rise of HTML5. Some platforms, like YouTube, previously supported FLV, but MP4 is now the preferred choice.  Some Older video content that was previously used for Flash players might still use the FLV format.

6. WebM (Web Media File)

WebM is designed for web-based applications and is used by platforms that support HTML5 video, such as YouTube. It provides high-quality video at smaller file sizes, making it great for fast loading.

Best for:

WebM is designed for web-based applications and is used by platforms that support HTML5 video, such as YouTube. It provides high-quality video at smaller file sizes, making it great for fast loading.

Best for:

-YouTube streaming

-HTML5-based video content

7. GIF (Graphics Interchange Format)

GIFs are short, looping video clips often used for memes, reactions, and quick animations. While they lack audio, they are widely used across social media for engaging, fun content.

Best for:

-Short, looped clips

-Social media memes and reactions

Choosing the Right Format for Each Platform

Different social media platforms have specific requirements and recommendations for video formats:

Facebook & Instagram: MP4 (preferred), MOV (supported)

Twitter (X): MP4 (H.264 codec), MOV

TikTok: MP4 (preferred)

YouTube: MP4 (preferred), WebM, MOV, AVILinkedIn: MP4 (preferred), MOV

Conclusion

Selecting the right video format for social media is essential to ensure quality, compatibility, and optimal performance. MP4 remains the best all-around choice, but understanding other formats can help tailor content to specific needs. By choosing the right format, content creators can maximize engagement and reach a broader audience effectively.

The Power of RAW Recording in Video Production Services

Introduction

The world of video production and filmmaking have been on a merging path in recent years.  The videographer today is looking to produce images on the level of that produced by Hollywood filmmakers and their feature films.   In the dynamic world of video production, the quest for the highest quality and most flexible footage has led to the widespread adoption of RAW recording. RAW, an acronym for “raw image format,” is a file format that captures all of the data from a camera’s sensor without any in-camera processing. This method of recording provides a videographer as well as filmmakers with unparalleled control over their footage during post-production, offering a myriad of possibilities for color grading, exposure adjustments, and overall image refinement.  Today, RAW recording format is the game changer that gives a videographer with a small mirrorless camera and an external recorder the leverage a hollywood filmmaker once enjoyed.

Understanding RAW Video

RAW video differs from compressed formats.  Most web based video formats, such as H.264 or H.265, are essentially data-reduced files that are more manageable for playback on the internet.  Even expensive video cameras compress footage somewhat when recording internally so the content can fit on media like an SD card. In contrast, RAW preserves all the original data captured by the camera sensor, storing it in a minimally processed state. This “raw” data often includes much more color, brightness, and contrast information with much greater precision than compressed formats.

Advantages of RAW Recording

Enhanced Color Grading:

One of the primary advantages of RAW recording is the ability to perform extensive color grading in post-production. RAW footage contains a wealth of color information, allowing filmmakers to manipulate color temperature, saturation, and hues with greater flexibility. This results in more vibrant and nuanced visuals.  In addition, it allows the videographer to customize the color to achieve a desired mood or effect.  Below is an example of a still extracted from video shot in RAW format and color graded to create a cinematic mood.

RAW recording sky line - video production services

RAW formats preserve color and exposure information to produce these types of vibrant and often challanging images.

Increased Dynamic Range

RAW recording retains a higher dynamic range compared to compressed formats. This means that details in both shadow and highlight areas are better preserved, providing cinematographers with more latitude to recover information in overexposed or underexposed scenes.  The dynamic range also provides for better gray scales so images most often look more realistic.  For example skin tones transition from light to dark or sky gradients can be difficult to expose for. Having wide dynamic range allows videographer capture the gradient and produce a realistic image.  Below is an example of a shot with a sunrise which would be impossible to shoot without the high dynamic range achieved in RAW recording. 

sunrise - videographer

Sunrises are usually difficult to exposes, but RAW format has the information to generate accurate gradients.

Flexible Exposure Adjustments

RAW files allow for non-destructive exposure adjustments, enabling filmmakers to correct or enhance exposure levels without degrading image quality. This flexibility is particularly beneficial in challenging lighting conditions where precise control over exposure is crucial.  Often a videographer has to compromise what to expose for.  Once again, sunrises are a good example.  With RAW format there is often enough exposure information where this compromise can be avoided and the shot can be adjusted to achieve a desirable image.

Grade vs ungraded sky - videographer
graded vs ungraded skin - Corporate video production

Flexible adjustments allow a videogrpaher to shape the image

Sharper Detail and Resolution

AW files often maintain higher levels of detail and resolution compared to compressed formats. This is essential for productions that require extensive post-production work, such as visual effects or high-end finishing.

Challenges of RAW Recording

File Size

RAW files are substantially larger than compressed formats, requiring more storage space. This can pose logistical challenges during production and post-production, necessitating ample storage capacity.

Processing Power

Editing and processing RAW footage demands powerful hardware. Video editing software and systems need to be robust enough to handle the significant data load associated with RAW files.

Time commitment:

To set up a RAW format in video production services, many variables have to be addressed in camera and external recorders.  Hence this format is not a good option when filming events where flexibility and mobility are more crucial.  Moreover, working with RAW footage requires a certain level of expertise in color grading and post-production workflows. Additionally, each clip in the sequence needs some level of adjusting, since raw format that is not adjusted is pretty flat.  Hence, post production on RAW format requires significantly more time. 

Conclusion

RAW format is not a good option for every corporate video production.  Some projects still benefit from standard format which still can produce great video production.        However, today RAW recording stands as a powerful tool for filmmakers and videographers seeking uncompromising control over their visuals. The benefits of enhanced color grading, increased dynamic range, and flexible exposure adjustments make RAW a valuable choice for those prioritizing image quality and creative freedom. While it presents challenges in terms of file size, processing power, and a time commitment, the advantages it offers can significantly elevate the quality and impact of the final product. 

Corporate Video Production – the Right Way

As a freelance videographer, my bread and butter is filming corporate videos.  In the past blog I did speak about how to record a good interview.  Therefore, I am not going to go too deep into the details of an interview, although the interview is a big portion of a corporate video production.  Instead, I am going to talk about how to go from the initial preparation to the final edit of a good corporate video.

Corporate Video Production – the Preparation

Before you grab any camera equipment, make sure to have at least one meeting with your client.  As videographers, we tend to think of cinematography first.  We always want to frame interesting shots, make sure the lighting is spot on, and sound is as clean as possible.  However, being so focused on visual composition, a videographer may miss key aspects of what the clients want to include and exclude in the video, and in all honesty sometimes clients do not always express these clearly.  Sometimes the client assumes that certain things are given. For example, I worked on a corporate video production for a pharmaceutical company.  We worked with a few lab employees and spent the entire day filming great looking scenes.  We showed our beautiful footage to the client, and although the client was impressed with our video production, they said that employees did not wear the right protective gloves and therefore we were forced to reshoot everything from that day.

The Interview for Corporate Video Production

I will spend only one short paragraph on this topic because I have written an entire blog on this topic before.  For any corporate video production interview, you want to make sure you have two cameras.  Two cameras allow you to cut easily and avoid jump cuts.  Set up good 3 way lighting, although that is not always possible.  Hence, I recommend having a small portable light kit.  Any corporate videographer should have few LED 1 x 1 panels.  Make sure you have a good microphone, preferably a lavalier mic.  Lastly, make the interview conversational, so the speaker sounds natural and is not rushed. 

B-roll for Corporate Video Production

Getting interesting b-roll video footage on a corporate video production shoot can be challenging.  Let’s be honest, hardly anything exciting ever happens at your typical office.  There are only so many shots of someone walking in the cubicle aisle or typing on the computer.  One thing to avoid is slow motion.  Unless someone in the office is doing a backflip, there is nothing dramatic about someone shaking hands or opening a laptop for 15 seconds.  Many corporate videographers make this mistake.  The video often looks even more boring. 

One way to spice up the B roll is to ensure the corporate participants are engaging with one another.  I often get several people into a group and let them talk about the baseball game, make them tell jokes, or have them play games.  When people are having they often forget they are being on camera.  In one video we wanted to capture a 30 minute timelapse of a group brainstorming.  We had about 7 participants create a flowchart on the white board of a fictitious company.  The exercise turned out into a fun game where all participants took turns adding content to the white board and even continued on after we called CUT. 

The time-lapse of corporate participants starts at 1:38 .

Although corporate video can be boring, as a videographer it is your job to find something visually interesting.  You need to get creative and think visually beyond what typically happens at an office you are filming.  On a recent shoot, we noticed a conference room with a large window looking back into the hallway.  We wanted to visually show teammates collaborating.  We brought bunch sticky notes of different colors and had about eight participants have fun and start arranging them on the glass.  Once again, the participants turned the exercise into a game.  Some were listing their favorite restaurants and others listing famous athletes.  For our video the content of what they were writing on the notes did not matter.  What did matter, waa that they were having fun and truly did collaborate with emotions.  We filmed them from inside of the room and through the glass getting an energetic visualization of corporate collaboration. 

Lastly, for a good corporate video production broll you need many angles.  Do not spend too much time getting perfect lighting for someone typing on the computer.  If you are going to do that make sure you take that shot from several angles.  Do a wide, medium and close up of typing.  In post corporate video production you will need short snippets of the same action, this way you can cut quickly and move the story.

Corporate Video Post Production

As in any video production, I suggest to edit as soon as possible.  This way the footage is fresh in your mind.  In fact, when I film on location, in my mind I am already editing.  I know what shots will be the opening and closing shots, and what shots I need as I transition from one theme to another.  

If an interview is part of your corporate video production, I suggest cut a rough interview only, with no broll.  Explain to your client that you first want to narrow the story down, the content of what is being said.  In this rough interview cut, avoid cutting out “ Ah”, pauses, and general speech flaws, you can cut that out later once you add broll.  Just make sure the interview flows and is succinct.  Once the interview is approved, it is much easier to add broll.  At this point use broll to cover up any jump cuts resulting from more thorough edits (like cutting “ahs”).

Last step in good corporate video production is an audio mix.  This last step really separates the really professional videos from amauter work.  The viewer is much forgiving to flaws in color corrections or loss of sharpness.  However, bad sound is jarring to the viewer.  I have written an article on how to get good audio for your corporate video production and for a more thorough tutorial on mixing for video/filming go here.  

In Sum, corporate video production can be a very rewarding (and lucrative) experience.  Although an office setting can be dull, your job as videographer is to find creative ways to add enthusiasm to a corporate video production.  Think of this way, Mike Judge created a successful comedy by poking fun and filming simple office scenes most of us can relate to.

Video Production- Preparing for a Video Campaign and What to Expect

Video production

A video is still one of the best marketing tools available, and in current times where more content is becoming virtual, video is becoming even more important than ever.  I have been working now for about 6 years as a videographer, mainly in the Chicago area.  Over this time, I have learned how to get the best value out of video production for promotion of various businesses, services, and brands.

Know the Platform for Your Video Production

First thing to consider when planing a video production is what platforms you want to promote, where your audience is, and how to effectively engage them.  Video renders will vary, depending on the platform.  The ideal duration for a video on a main website page is about 2.5 – 3.0 minutes.  This video should succinctly explain your product or service.  It is very likely that the viewers will watch the video before reading any other material on the website, so the video has to be thorough.  It is also assumed that someone on a website is actively researching your type of product or service.  

An example of brand video that is well suited for a home page

On the other hand, instagram limit is currently 1 minute.  However, the ideal video for an Instagram feed should be 45 seconds or less.  Therefore, if you plan a video to promote your product or service you have to think of shorter cuts for Instagram.  In addition, Instagram stories, Facebook stories, and IGTV are designed for a vertical video crop, given that the audience will be viewing the content on the phone.  Another reason for keeping the videos for Instagram 45 seconds or shorter is that the content on that platform is viewed very briefly.  Instagram viewers are not researching content like they would if they were browsing  the net on a computer.  They are looking for little snippets of entertainment.  Therefore, when designing a video for instagram, avoid trying to explain your product or service in detail.  That information should be left for your website.  One good example of a successful Instagram video campaign I produced was for a dental practice in Chicago.  14 dentists were asked a series of questions like the color of their toothbrush or how cool they thought they were.  We cut these into a series of 20 second videos.  The content of the video had nothing to do with their practice as dentists but it showed their personality as they answered these goofy questions.

https://www.facebook.com/CameoDentalSpecialists/videos/222829796130896

a link to a Facebook 20 second video that was also use in Instagram video campaign

Know your Audience for your Video Production Campaign

Given the multitude of social media platforms that today can host videos, it is often unclear where one’s audience is at.  I have been told by business owners before that their particular clientele finds them at a specific platform or that their clientel does not frequent social media platforms.  I would warn against such limited foresight.  For instance, one of my clients has a medical practice in south Florida focusing on muscle-skeletal injuries.  His patient demographic tends to be mainly 50 years or older.  However, as we have talked I learned that he was treating a gym owner who became a big fan of his procedures and began referring patients to the clinic.  I suggested to him he should reach out to more fitness professionals, like personal trainers, who deal with older clients prone to injuries.  Of course, every trainer is currently marketing their services on Instagram.  Therefore, the smart course of video marketing would be reaching fitness folks who would then refer their older clients (who by the way might not even know what Instagram is) to the medical clinic. 

Think Big, Think Video Campaign

Lastly, as a videographer, I now suggest to plan not just for one or two videos but instead a video campaign with renders for various social media platforms.  In the past it was perhaps enough to create one video, upload it to Youtube and embed it on your homepage.  However, chances are that your competitors are doing far more.  A well planned video production day can cover enough material where many versions of a video can be cut.  In case of the medical clinic previously described, we planned a 1 hour interview with the main doctor, during which we talked about him personally, the philosophy of his practice, his procedures, and asked for a few short health tips.  The personal and practice philosophy material was mainly used for two brand videos.  The procedure content served as a 1 minute video for each procedure landing page. Health tips were used as a series of 7-8 30 second free health tips video used for Instagram and Facebook intermittently throughout the year.  Few of the procedure videos were also cut to shorter version targeting conditions personal trainers see and placed on Instagram.  We also cut a few fun personal facts that didn’t make the main video cut, and once again used them as short 30 second videos for more instagram content and IGTV.  In the end we cut about 20 videos from one 1-hour interview.  

For sample of our work go to here


Video Production -How to get Clean Audio

Video Production and video content will be more important now than ever.  Every business owner will be looking to reach their potential client virtually.  Often this is done through video conferencing but when scheduling conflicts arise, many will be relying on filmed content.  As a professional videographer, I try to emphasize the value of professional video production.  The quality of video is a must of course but it is the quality of audio that separates amateur video content from professional video content.   In this article, I will talk about how you achieve that professional sounding audio.

Choose the Right Microphone for Video Production

The first thing to consider is the choice of the microphone.  More specifically, the location of the microphone is really the key in producing high quality sound.  The closer the microphone is to the subject the clearer the sound will be.  A recorded sound source has a signal to noise ratio.  The signal in our case is the speech of the human subject, while the noise are the sounds of room fans, crowds in the backgrounds, wind outside, and the echo of the voice created by the speaking subject.  Good microphones have higher signal to noise ratio.  However, even very high end microphones will pick up noise if the room is not quiet. 

My favorite choice of microphones are lavalier (and often wireless) microphones for any film or video productions.  When I film an interview I can clip the mic about 6 inches from the mouth so the speaking sound is well recorded.  Most lavaliers have what is known as an omni pick up pattern which means they pick up signals equally well from all directions.  This means that a lavalier microphone can be clipped upside down and it will still sound clean.  Another popular choice for recording speech in film and video production is a shotgun microphone.  The pick up pattern for a shotgun microphone is very narrow which means that the microphone has to be pointed directly at the speaker.  However the narrow pick up pattern reduced the noise by eliminating sounds that are not in focus (or pointed at with the mic). It is important to remember that the shotgun microphone needs to be placed as close as possible to the speaker to pick up good sound.  Although, I personally prefer a good lavalier mic, there are instances where the shotgun mic actually works better.  For example, when there are multiple speakers talking over each other, multiple lavalier mics can interfere with each one another.

Sennheiser lavalier wireless mic set I use in my video production
This is a Sennheiser lavalier wireless mic I use in my video production

Learn Post-Production Audio Tools

Once audio is recorded using a well positioned microphone, more work is needed in film or video post production.  As a professional videographer, most of my video editing work is done in Adobe Premiere software.  However, I like to migrate my audio work to a Digital Audio Workstation (DAW).  DAWs are programs designed for musicians to produce their work.  These programs offer flexibility that simply Premiere and other video edit programs do not.  In this article I will not go in depth why DAWs are better for audio, but instead focus on a few key components of audio mixing. 

This is a DAW that I have been using for years, however there are about dozen other ones that will do the job.

The first mixing tool that I use when treating recorded audio in video production is compression.  Compression allows to attenuate the volume of parts that are too loud and increase the volume on parts that are not loud enough.  This treatment can also resolve volume inconsistencies that occurred during the video filming session.  Next in the mixing chain is equalization or often referred to as simply EQ.  EQ allows us to increase the volume across specific audio bands.  For example, most speech recordings have the low end rumbling sound when initially recorded.  Using an EQ I can reduce the rumble by cutting off all audio frequencies say below 70 Hz and create more presence in the high frequency by increasing volume at around 6 kHz.  Another useful tool in the mixing process is the noise reduction. There are many good ones out there but essentially what they do is scan the audio source and use an algorithm to separate signal from noise.  Of course, these tools are far from perfect and they only help and cannot be used in place of good recording.  Another tool that is often used to reduce noise is gate.  Gate basically has a threshold at which it allows the sound to pass through.  So if noise is below that threshold, the gate will be closed and no audio will pass.  The gate is very useful at reducing noise in between words.  The scope of this article cannot cover mixing tools like compression, gate,  and EQ in detail but there are hundreds of articles and Youtube videos that focus specifically on these tools.  Below is a video in which I thoroughly explain my approach to mixing sound, sound design, and score in film production. 

A tutorial I made on the process of mixing for film. I am using a scene from my film THE ARTIFACT

Audio is Key to Professional Videographer

In this article I merely hinted at what is the process of getting clean audio in film or video production.  Of course, each video session is different and presents a variety of audio problems with an even larger variety of solutions.  In the end, a professional videographer has to learn how to record clean audio.  Essentially, it is the ability to handle the audio that separates a professional videographer from a photographer who simply hits “record” on his/her very capable camera.  

For more sample of our work click here

Highlight Video – How to Promote your Conference

As a videographer I learned that Conferences are one of the most effective venues for networking.  Conferences can be very large with hundreds/thousands of participants or they can be small but intimate.  Regardless of their size, industry colleagues drop their guard and are often are open to engage and network, and those of use running a business can always use more networking.

Highlight Video will be your Key Promotional Tool

Given the importance of a business conference, what is the most effective method of promoting a conference?  I am going to be biased here, but I truly believe it is through a video. Yes, posting pictures on social media can get some engagement, however most people will not look past 4-5 pictures, unless they are looking for something or someone specific.  A well produced video is far more effective.

One key element of a conference highlight video are sound bites.  Sound bites are different than a full video interview. As a videographer, when I film an interview I will spend 30 minutes staging my shot, setting up the lighting, and testing perfect sound conditions for the subject.  When I film interviews, I often film them with multiple cameras. When you film sound bites at a conference you simply do not have such luxury. At a conference you are looking for a volume of responses, so you grab someone and ask them 1-2 questions using a single camera.  The advantage, however, is that you will likely capture the excitement of the moment. If the speaker is excited to be at the conference, it will be captured on the video. Additionally, in short interviews subjects rarely get nervous, whereas a full interview with multiple cameras and lights often intimidate folks.

Me filming a video at a Chicago Conference

Capture the Energy with a Video

A well filmed video will also capture the energy of the conference.  After filming a number of conference videos I have learned that it is crucial to show that people are interacting.  Therefore, I look for scenes when people are talking, laughing, exchanging business cards, shaking hands, pointing to charts/posters, and exchanging documents.  Although many conferences span over many hours, a skilled videographer will capture these moments and edit the highlight video in such a way to show how much interaction goes on among conference participants, sponsors and at times even the speakers.  

Show off Your Location

Last but not least, if a conference takes place at an attractive location, few shots should be dedicated to showing this off.  For example, if a conference is located in New York, few shots outside the conference will be helpful. If the conference is near a beach this is a good time to bring that drone and maybe fly over the beach.  You can read more about when to use drones in my previous article by clicking here.

Above is my favorite conference highlight video I did a few years ago. This particular video took some planning and we had two speakers with prepared speeches.  Notice, to keep the momentum going we decided to film a walking interview. This helps the video move and tells a visual story of what the conference is like.

For more of our work click here

Drone Videogrpaher – Video Production in the Sky

In the last several years there has been madness around drone video production and photography.  As a videographer, I am constantly asked for drone video footage. At times the drone video footage is appropriate, but at other times the use of a drone is only reflective of an appetite for the latest fad.  In this article I will discuss when it is appropriate to use drone for filming or video/photo production, few simple safety rules and regulations, and how to get those cinematic shots.

When to Use drone videography

Clearly, drone footage is highly desirable, and it certainly adds production value simply unavailable to a low budget filmmaker or videographer just a decade ago.  However, I can think of only a handful of films in which drone footage was an actual scene. One being Denis Villeneuve’s “Sicario”, where the scene is a convoy of agents crossing the border.

Drone video footage is most effective as an establishing shot or a transition.  Realistically, a drone video in the final edit will unlikely be longer than 10-15 seconds.  Majority, of scenes in films and corporate / event video productions are composed of medium shots where people either talk to each other or physically interact.  For such shots a good camera on a tripod or gimbal will do. A good example of an establishing shot is the clip below

Within a few seconds the viewer has a good idea that the film will take place in a city and during winter.  Without a drone, the same information would have to be described using several shots.

An example of a good transition is the clip below where we show few trucks leaving their base and going out on an assignment. 

The shots prior to he drone shots convey the story of workers getting ready and shots after the drone shot convey a story of these men at work.  The drone shot gives a completely different perspective than the other shots, hence it serves its role as an ideal transition.

Commercial vs Recreational Drone Videography

There are two uses of a drone that clearly have to be distinguished when talking about rules.  One is commercial work, where the aerial videographer is getting paid for his/her work. In such a case, the drone operator needs to be certified through FAA (part 107) as an unmanned pilot.  For recreational use, such as filming one’s vacation or private party, the pilot only needs to register the drone with FAA and the cost is currently only $5. The FAA has a list of rules that need to be abided by all unmanned pilots.  In this article I will point out to three main ones; flight is restricted to only 400 ft, pilot cannot fly 5 miles from the airport, and a drone cannot be flown over people (unless they are crew and have shelter to hide). The first two rules are usually programmed in the drone control application.  In other words, the drone will recognize airport controlled air space and will not fly there, and it will not fly over 400 ft. However, the last rule, flying over people is the one that is most often violated by the recreational drone pilots. It is very important to know that the last mentioned rule is also the one that the FAA is most strict about and heavy fines can result from flying over people.  Rember, you can get away with it during the operation but the footage does not lie.

In addition to FAA rules, each city/county has its own rules that may restrict drone flight.  As Chicago Aerial commercial videographer I understand that city only allows me to fly over the property for which I have written permission to fly over.  In a busy city this creates real restrictions. It is also important to mention that drones operate on the same frequency that are used by most wifi systems.  Hence flying in highly populated areas with corporate offices (Chicago downtown i.e.) create real risk. There is potential that the drone could lose its frequency and fly away.

Think Simple When Using Drone for Videography

Once the rules are considered and the effectiveness of aerial shot is understood, a drone is a great tool for video and film production.  If there was going to be one lesson that I have learned as a filmmaker and a videographer that I would like to pass on to in this article is that of simplicity.  Simply, the viewer should be focused on the scene that is framed not to the motion of the drone. Beginner aerial videographers tend to fly too much around the subject they are filming.  For example, the first 35 seconds of this clip we have at least 5 changes of direction and pace which in my opinion are disruptive to the viewer.

Yes the effect is cool and the scenery is gorgeous but the abrupt changes in the flight path speeding up and slowing down (in post production) takes me out of the viewing experience.  I am more focused on what the drone is doing than the actual scenery. However, lets consider the following drone clip:

In this video we have a change of direction but there is a poetic simplicity to it.  First 18 seconds the shot is framed around the human subject and then gently moves to frame the waterfall.  This is a well thought out drone shot that frames two subjects continuously (man and waterfall) with no interruption.  The last shot is likely most cinematic (1:34 to the end) where the drones simply flies slowly forward.

Conclusion

In conclusion, drones are a fantastic tool for filmmaking and video production.  However, the footage is mostly effective as an establishing shot and transitions in the majority of film/video productions.  Lastly, drones have potential for high risk and therefore many rules have to be followed in order to assure safety in capturing those stunning shots. 

For more information click here

Time Lapse Videography- How to Compress Time

As a videographer, I am always trying to effectively tell a story. I have discovered that one of the most effective storytelling tools in video production is the time lapse. 

With a time lapse you can compress a long and static event into a short engaging video clip. An effective use of a time lapse videography is a party like the clip below where people mingle around but don’t do anything too interesting to capture as video clip. As a single video shot this would be as interesting as watching grass grow.  However, when compressed into about 3-5 seconds the video clip is engaging, and it tells a story without boring the viewer.

Consider Your Subject for your Time Lapse Videography

When making a time lapse there are few things to consider. First, what is it that we want to focus on.  The image that we want the viewer to lock on should be still or slowly progressing/regressing. On the other hand, the figures or characters moving around will be moving fast and so we want to blur them out. In video production of a time lapse this is achieved through motion blur with the use of a slow shutter speed. The shutter speed in the above mentioned video clip was set at 1/3 sec and we get a ghosting effect of the people.  Hence, the viewer perceives the activity but is focused on the aesthetics of the room and people who are still or moving slow. 

Add Movement to your Videography

Another important element to consider when setting up a time lapse video is movement. As discussed earlier, repetitive movements like people mingling around should be blurred.  However if we want to add drama to the video we can SLOWLY move the camera to the point of focus

Or we can SLOWLY move around the subject like here.  The movement should be just above the threshold of being noticed because this type of movement is effective if it is felt rather than seen. 

The slow dramatic movement of the camera in a time lapse is achieved by using a mechanized slider.  The slider moves the camera progressively from start to end point every time a picture is being taken. 

Alternative Methods of Time Lapse Videography

As a videographer and a filmmaker, I don’t always set up a traditional time lapse where camera takes picture over set period of time. Sometimes I will film a long video clip knowing that I will manipulate the time. For instance, I will speed up a gimbal video clip to make the a scene more dynamic. An advantage of this video production technique is that I can slow down the clip at specific moment to highlight something interesting.

There are also some very sophisticated time lapse techniques where the slider movement and or speed of the time lapse change over the course of time. These type of time lapse video productions require careful planning and tools like a computerized application that can control video production sliders or dollies.

In sum, a time lapse is a video production technique that can show something otherwise boring in a new, fun and engaging way.  And yes, it can even make watching grass grow exciting!

For more information click here

Videographer and The Art of an Effective Interview

My bread and butter as a videographer (especially a Chicago videographer) is filming interviews and testimonials. I have filmed hundreds of such interviews, I have worked with other videographers setting up interviews and I have seen many more video interviews all over the web. Over this time I have learned a few important keys to making a good and engaging interview.

Be Brief

First point, be brief. When I set up a video production interview I usually end up talking to my subject for 30 -40 minutes.  However, an effective interview video with one subject is 1.5 minutes to 2.5 minutes. When I get a response from my subject that is long, verbose, and it feels like he/she is wondering with an idea, I let them finish, complement them on how good their response was and ask them to summarize it in 2-3 sentences. Sometimes it takes a few takes. Hence, allow 40 minutes for an interview. 

Make the Video Production Interview Conversational

Secondly, make the interview conversational. There is nothing more boring and flat than reading off questions to the subject.  As humans, we are social beings. Yes, the subject understands that ultimately he/she is talking to an imaginary audience and he/she is just being filmed. However, I have seen shy people open up to me when I engaged them with a conversations. They forget the camera is pointing at them and give me content that is riche and personal. At times, as videographer, you can’t engage in conversation or you don’t feel comfortable doing it, and prefer just attending to the gear. If this is the case, it is worth bringing another person to whom the subject can talk (and engage). 

Use 2 cameras for your Video Production

Always use at least two cameras for your Video Production.  Having multiple angles makes the editing much easier.  You can easily cut the interview and jump from one camera to another during the transitions.  Cutting interview filmed with one camera creates distracting jump cuts. Additionally, having multiple camera angles makes the video more dynamic. Sometimes, I even add a little slider movement like in this video to add more dynamic feel to an otherwise static shot.

Sound is Huge for Quality of your Video Production

The sound quality is huge. In my video production I use high end lavalier microphones. The lavalier mic is close to the subject and you get much more voice signal and less environment noise. Truthfully, most viewers watching these types of videos will not be able to tell difference between a video shot with a $30k camera and something shot with a smartphone. However, bed sound is immediately noticeable. Bed sound screams “amateur” video. If you don’t have a good lavalier mics you can use a shotgun mic. Ideally, you want to get the microphone as close to the subject as you can. You can mount such microphone on a stand and run the cable to the camera. Mixing of the sound is also crucial. To get that professional sound quality you always want to add a little compression to the sound, so the loud parts are attenuated and quite parts are turned up. I often use a little EQ to remove the low end of the sound spectrum. When mixed with some music, the voice that is compressed and lightly EQ will cut through the mix easier.

You will need Good B-Roll for engaging Videography

Lastly, to make a video interview engaging you need to have something visual to cut to. Often this is B-roll. B-roll shots are visuals scenes that support the story the subject is telling. However, sometimes I use photographs from the subject and build a collage that visually tells the story. When I do this type of a collage, I actually prefer photos that are not taken professionally, as they better represent the reality of the person being interviewed.  

In sum, a video interviews need to be cut to about 2 minutes, they need to be conversational, recorded with good sound and multiple cameras to dynamic . When done well, they are one of the more powerful marketing tools for any business, product or service.

Learn more by click here